Best FARA Warzone Loadout
With just over a week left in Call of Duty: Operation Monarch, many weapons are making a massive impact. With more tournaments, wagers and competition arising, we understand how vital it is to get any advantage possible. With our dedicated Warzone page, you can find tricks, tips and other loadouts to support you in the hunt for victory. For this specific loadout guide, we have chosen the overlooked FARA 83 Assault Rifle.
Despite the likes of the STG and FFAR being very strong in the AR class, our version of the FARA 83 can keep up, and in some cases excel past its competition. Here’s our guide to the best FARA Warzone loadout.
Get Levelled Up
Like all other loadouts and weapons, we must level up our chosen gun. Firstly, you will need to equip a double XP weapon token, as this will quicken up the progress of getting to max level. Next, set up your class with the FARA 83, Double Time, Ghost, and Amped. Like our other loadouts, we will have increased sprint, be able to stay of radars and utilise equipment more efficiently. Next, choose Rebirth Island, as this is a smaller map and will allow for better XP token usage, there is more enemies to eliminate, and you can achieve quicker contract completion.
Ideally, you should choose Solo, but if you have allies, Duos or Quads can work just as well. After you drop in, get a vehicle, and go for supply runs. If you’re in a team one can drop for a contract, whilst the others travel in vehicles to complete quickly. The other great XP contract is a bounty. If you are Solo, ensure you have equipment to stun and injure the target, then press in. With a group you can also flank to ensure completion. Once max level is achieved, back out to create the full loadout.
Attachments and Perks
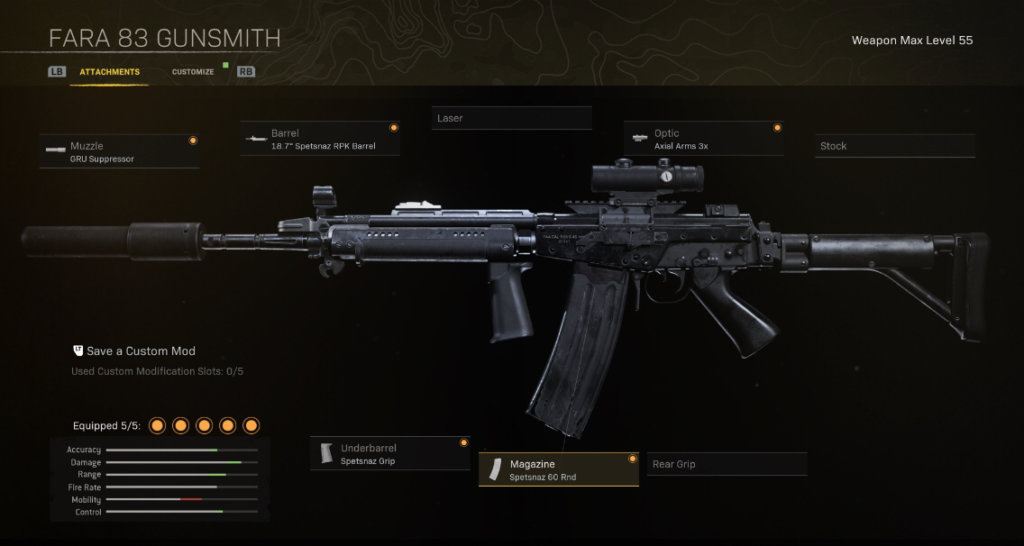
| Muzzle: | GRU Suppressor |
| Barrel: | 18.7 Spetsnaz RPK Barrel |
| Magazine: | Spetsnaz 60 Round |
| Underbarrel: | Spetznaz Grip |
| Optic: | Axial Arms 3x |
| Class Perks: | Double Time, Overkill, Amped |
| Overkill Weapon Choice: | MP40 |
| Lethal: | Throwing Knife |
| Tactical: | Stim |
How each Attachment and Perk works together
With having a base weapon that performs well at medium to long range, we wanted to increase accuracy, damage, range, and recoil control. Our Muzzle will allow you to stay more concealed across the map. Both Barrel and Under Barrel, allows you to increase the range without much damage drop-off. This allows an increase in bullet velocity for those intense longer-range fights. Note, this build is not meant for close quarters, as the Overkill SMG should cover you for those engagements.
The extra magazine rounds will allow you to clean up multiple targets, without having to experience the dreaded reload time in fights. The Axial Arms 3x Optic is perfect for engagements, as there is little recoil and scope sway. We highly recommend you do not switch this, as this AR can quickly dispatch any opponents with minimal recoil management.
As a quick note, Double Time will allow for better Sprint, Amped for better equipment usage and as previously mentioned, Overkill will assist you with a weapon for close range. Your Throwing Knife will eliminate downed enemies, thus allowing you to spare ammunition. Stim will also give you quick HP regeneration in tough situations.
Recommended Playstyle
With a highly effective AR and SMG combo, both Caldera and Rebirth are suited for this loadout. If you do however prefer Rebirth, place more of an emphasis on your SMG setup. For this loadout, Rebirth is marginally better. As soon as you enter the drop, we would recommend a start at Bioweapons. You will normally find many third-party chances here; this will raise cash for loadouts.
Once you have you best FARA Warzone loadout set up, you can battle through Prison Block. When you can, go to the top and pull out the FARA 83 and let rip. When mid-game comes around, you can make that area a no-fly zone, as your AR will experience little recoil, and can punish anyone dropping down. The great advantage of Prison Block is its view of every part of the map. Take advantage of this, then when circle moves, make your way to the next position.