So, you’re an avid gamer with tons of experience and decide to share that with the world. You decide that the best starting point for you is to become a streamer, so you do a little research, register on your favorite platforms, download Streamlabs, your software of choice, only to notice that you have yet to learn how to set it up. You also have to master Streamlabs settings plus overlays and find ways of optimizing your chat with Streamlabs commands.

Not to worry, these problems are easily solved thanks to Streamlabs’ ease of use. After going through our Streamlabs guide, managing your Streamlab settings should be a breeze, solving the question of how to use Streamlabs. We know that many factors, such as a subpar streaming setup, faulty hardware, lousy internet, etc., can hinder your overall stream quality and performance. Fret not. Streamlabs can always help optimise your streams’ quality, even in little ways that matter if used correctly. There are just some general rules to follow when tweaking your Streamlabs settings.
Streamlabs Settings Every Streamer Should Consider
The settings on Streamlabs usually depend on the specific use case and content streamed, but generally, some good starting settings for streaming with Streamlabs OBS include the following:
- Encoding:Use the NVENC (Nvidia) or AMF (AMD) encoder for faster performance, as these are hardware-accelerated encoders.
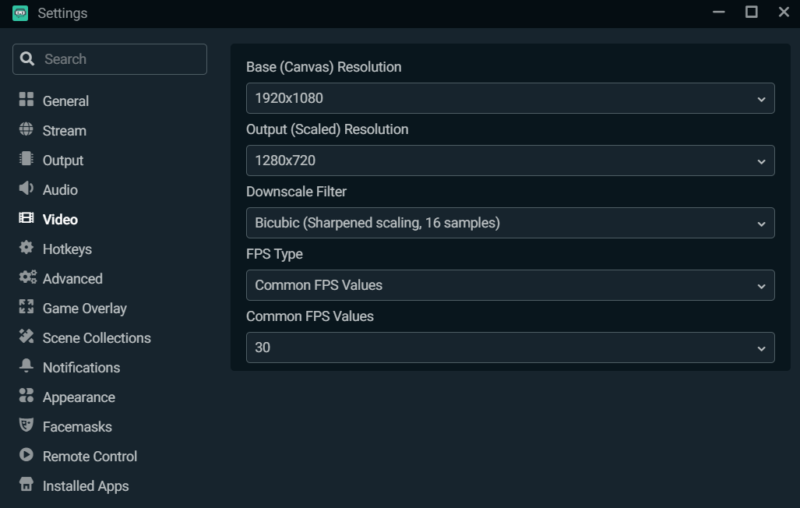
- Bitrate: As most streamers opt for 60FPS in the modern age and we recommend, if you have the internet speed for it, to consider 8000 kbps the sweetspot for 1080p 60FPS streams. 6000 for 720p
- Resolution: Use 1080p resolution for most streams, as this is the most commonly supported resolution. 720p will work for those that are using older hardware for streaming. For those that only stream to Twitch and not YouTube, many creators prefer to use 936p as their target resolution, as 1080p on Twitch, while standard, isn’t as well optimised for encoding. To do this, set a custom resolution of 1664×936 in your Output scaled resolution. NOTE: If using 936p, change your Downscale Filtering to Lanczos.
- Frame Rate: Use a frame rate of 60 fps for most streams, providing a smooth viewing experience.
- Keyframe Interval: Set the keyframe interval to 2 seconds.
- Audio: Use a sample rate of 48kHz and a bitrate of 160 kbps for the best audio quality. YouTube’s compression allows for 128 kbps, however there’s no harm in going higher, especially if you stream to both.
- Internet: A stable internet connection is crucial for streaming, so ensure you have a good internet service provider and use wired connections whenever possible.
These are some basic Streamlabs settings tweaks that you can do to ensure you have a better understanding of how to use Streamlabs to make your streams look better and run smoothly.

Image Credit: Streamlabs
General Tips on Streaming with Streamlabs
Aside from the adjustments you’d make to your Streamlab settings, you’d also have to make some ‘personal’ adjustments for yourself as a novice streamer. So here are some handy tips for making your stream top of the class.
- Have a consistent schedule: Having a consistent schedule for your streams will help your viewers know when to tune in and will help you build a regular audience.
- Engage with your audience: Respond to comments and questions during your streams, and encourage your viewers to interact with each other. This act will help create a sense of community around your streams. Encourage a clips culture so that your highlights are easy to find and turn into short form content.
- Promote your streams: Go the extra mile when creating social media posts to announce your live content. Embedding shorts in tweets helps with traction over a generic text post.
- Invest in good equipment: Investing in a good streaming setup (microphone, webcam, and lighting) will help improve the overall quality of your streams. This however, isn’t iron-clad. Many popular streamers have outdated equipment. Prioritise Audio over Video when it comes to quality, as nothing turns away viewers like poor audio (in most cases)
- Be consistent: Be punctual and reliable. This trait will help you establish credibility and attract more viewers.
- Monitor your stream’s performance: Use tools like OBS Studio or Streamlabs OBS to monitor your stream’s performance and adjust as needed.
Standing Out
- Use overlays and graphics: Adding Streamlabs overlays and graphics to your stream can enhance the visual appeal and make it more engaging. Streamlabs has some inbuilt ones and more available via their own market place. But consider learning to make your own or finding more personalised ones on other sites, or commissioning an artist to give your stream that unique look.
- Short form content is king: Work smarter not harder. Look for opportunities to turn clips into content. This content can then feed back into your stream.
- Be yourself: Be authentic and genuine, and don’t try to copy other streamers. L`et your personality shine through, and your viewers will appreciate it.
- Take care of yourself: Streaming can be a lot of fun, but it can also be very demanding. Ensure you put in the effort required to take care of yourself. Eat well, drink properly and sleep. Use your days off to work on content offline that can feed back to your stream. Always try to remain conscious of your physical and mental well-being.
- Know when to call it a day: You can’t always have good days. Competitive game streams can draw an audience, but you can’t be expected to always be winning
Conclusion
If you take advantage of our Streamlabs settings and carefully follow these tips, you’ll be able to enjoy a basic streaming experience. Without plugins that help take your stream to the next level, its unlikely that you’ll be amongst the most-viewed Twitch streams, but that shouldn’t be everyone’s goal.
Streamlabs is also incredibly easy to pick up and use. Even more so now, with the ability to stream from different devices, including consoles and mobile. Streaming has hit a significant popularity wave, and now is as good a time as any to hop on that train.
Other Streamlabs Guides:
Frequently Asked Questions About Streamlabs Settings
How do I set up my Streamlabs for a stream?
First, download and install Streamlabs OBS from the official website. Then, connect your desired streaming platform (such as Twitch or YouTube) to Streamlabs OBS. You can do this by going to the “Stream” tab in settings and selecting your platform. Next, input your stream key, and you’re ready to go.
How do I use plugins in Streamlabs OBS?
You can’t. Streamlabs OBS is used as an entry point for a lot of streamers due to its ease of use. However, as a proprietary fork of the open source OBS main branch, plugin compatibility is non-existent. If you want to take your streams to the next level with quality of life or unique plugins, you’ll have to switch to OBS Studio.
How do I customise my Streamlabs overlay?
Streamlabs OBS has a built-in overlay editor where you can customise your overlay by adding elements such as text, images, and alerts. You can access this by clicking on the “Overlay” button in the main window.
How do I add music to my stream?
To add music to your stream, go to the “Sources” menu and select “Audio Output Capture.” Choose the audio source from which you want to play your music (such as Spotify or iTunes), and click “Add Source.” You can also adjust the volume of your music using the audio mixer. After this, you can now enjoy streaming your favourite songs and even become a popular music streamer.
How can I monetise my streams?
Monetising your streams is possible through different platforms such as Twitch, YouTube, or Facebook. Twitch has the “Affiliate” and “Partner” programs, YouTube has the “YouTube Partner Program.” Each platform has its criteria, and you will have to reach them to be able to monetise your streams.


